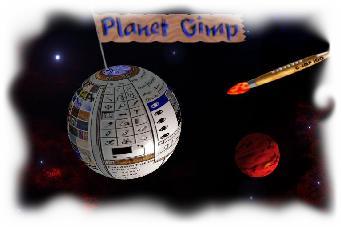
Download the full size image from planet gimp.jpg
The following is a description how I have done it. I tried to keep track of all steps taken, and to make things easier tell the menu path to the filters each time they appear first. If nothing is said there, it has either been mentioned before or is a tool from the toolbox or has been forgotten by me.
The Moon
- rendered solid noise, fiddled around with curves and levels, till it looked nice. (used: filter->render->solid noise, image->colors->curves, image->colors->levels)
- bumpmapped that on red background (filter->map->bumpmap)
- mapped that to a sphere (map to object)
The Background Sky
- black background
- rendered a plasma and used curves and levels to get the red and blue nebula and to get rid of any green (filter->render->plasma)
- set layer mode to addition
- create some novae (three different ones, the rest was copied) (filter->light effects->super nova)
The Brush Rocket G-IMP 100
- used bezier selection tool to get the outline of the brush's grip
- duplicate this and fill one with bilinear gradient tool (map to bump) the other with nice wood pattern. bumpmap the two (trying to keep in mind, where i put the lightsource when creating the moon-sphere...)
- bezier to get outline of brush-rocket-flare, fill that with many colored pattern (orange swiss cheese), play around with curves and levels and gaussian blur to get some nice colors. (filter->blur->gaussian blur)
- bezier select clip wich holds brush hairs to the grip, duplicate, gradient- and greyfill, bumpmap
- bezier a square select windows, fill with Blue Spikes pattern, duplicate, shapeburst gradient fill, bumpmap; curves and levels to get it right
- adding text in blippo font
- pasting the whole thing in Planet Gimp image, rotate and scale the layer with the transform tool.
The Gimp Planet
- Arranged Gimp's windows nicely around the toolbox and made a screenshot with xv (yes, here was another prog involved)
- mapped that on a sphere with the rotation set so that the toolbox is on the front. Copied that image into new layer
Pin and Flag
- use sphere script to get a grey sphere. Rotate this so that the light comes from the right direction, copy to new layer. (Xtns->scriptfu->misc->sphere; image->transforms->image->rotate 90)
- with airbrush draw straight line to the planes. With pencil draw some cracks
- fill a new image with crinkled paper pattern, fiddle around with curves and levels, gaussian blur that and give some waves onto it (filter->distorts->waves)
- text with paintbrush font. duplicated; on of them gaussian blurred and used as a map for the unblurred.
- perspective transformed the pasted flag so that it fitted the pin.
- put some ripples on it (wow, Gimp crashed on me three times in a row at this one!). Some bad pixels were then corrected with airbrush and convolver tool.
Well, I guess that's it :)